Typescript npm 库项目框架搭建
引言
npm 库对大家来说并不陌生,就和 java 的 maven 坐标一样,在前端项目中可以使用 npm 轻松管理这些依赖。
前些时间因为一些机缘巧合的需求,我需要编写一个监控埋点 npm 库以供应用使用。拿到这个需求之后,我第一时间做了一个初步的设计,项目无需 UI 组件,需要满足 Web、H5、小程序这三个平台的使用。考虑到 typescript 的种种优势,我选择使用 typescript 来开发,并觉得采用插件式的架构思想来对这个库进行拆分。网上有许多关于 typescript 编写 npm 库的文章和描述,但这些库相对于我的需求来说,总是多了一些东西或是少了一些东西,最终我根据网上的资料和自身的需求做了一个 npm 库的框架,适合用于中小型无 UI 组件的独立库,而如何搭建,如何取舍框架内的组件,就是本篇文章的主题。
一、搭建思路
由于项目框架是针对中小型无 UI 组件的独立库,所以在整体的搭建思路上更加偏向于轻量、快速、简洁,在设计模式上更加偏向独立,控制库的接口对外暴露,内部具体实现则无需对外暴露,接入方通过库的接口进行操作,减少项目的侵入性和耦合度。
1.1 框架要求
几经权衡,在既想保证库的简洁,又要保证基本功能都有的要求下,最终决定这样要求:
- 使用 typescript 开发
- 具备单元测试能力
- 使用代码静态检查(tslint)
- 代码风格统一
看到这里,大家对框架的技术选型已经能猜个八九不离十了吧。根据以上几个点来说,相应的组件库即为:
- typescript/tslint
- jest
- prettier & .editorconfig
同时为了解决环境和打包的问题还配备了 cross-env、webpack 和 uglifyjs
这里没有选用一些市面上主流 npm 库框架的全家桶,是因为我认为要想做到轻量、快速和简洁,框架提供一些必要且能基本满足需求的组件就足够了,如果有更深入的需求再添加也不迟。
对于这个项目框架来说,考虑后但舍弃的有以下组件:
- mockjs 没有考虑 mockjs 的原因是使用 mockjs 的成本较高,在与后端快速开发时往往会直接对接口进行联调,mock 数据并不一定需要。即使需要,也有许多接口管理类产品(yapi、rap、swagger 等)可以支持。使用 mockjs 来模拟的诉求并不强烈。
- commitlint 提交检测,commitlint 可以让 commit message 变得更加规范,保证提交的代码的稳定性,方便管理协作开发,多人协作时效率更高。舍弃 commitlint 的原因是,针对中小型的 UI 组件库,往往协作开发的人数较少,且业务相对较为简单。commitlint 在这种场景下增加了使用成本。
1.2 构建流程
基于以上的技术选型,我们将源文件 .ts 经过编译、压缩后最终生成 .js 文件和 .d.ts 文件,再将这些文件发布。
具体流程如下: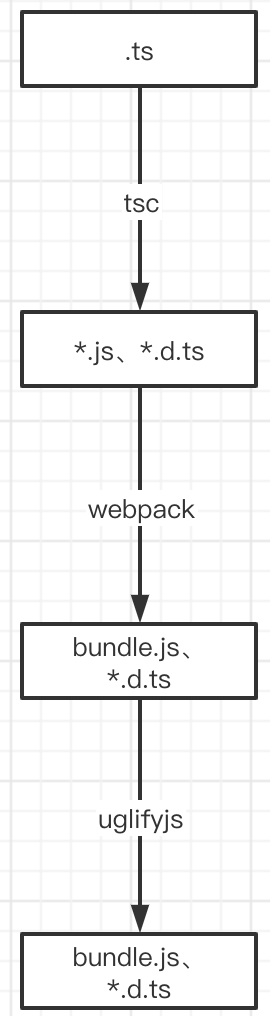
二、操作步骤
2.1 配置 typescript
执行命令:
1 | npm install --save-dev typescript |
执行后会在目录下生成 tsconfig.js 配置文件。
配置 tsconfig.js:
1 | { |
2.2 配置 tslint、editorconfig、prettier
项目根目录下新建 .editorconfig
1 | # EditorConfig is awesome: http://EditorConfig.org |
执行命令:
1 | npm install --save-dev prettier tslint tslint-config-prettier |
新建 tslint.json
1 | { |
新建 .prettierrc
1 | { |
这里配置了基本的
tslint校验规则和prettier代码风格规则,可根据需求修改。
2.3 配置 jest
执行命令
1 | npm install --save-dev jest ts-jest @types/jest |
配置 jestconfig.json
1 | { |
这里使用了正则匹配单元测试文件的目录及后缀,需要放在
__tests__目录下。如果使用 IDEA 想要直接通过「绿色箭头」直接执行单元测试,需要在 “Run Configuration” 中配置 Jest Options:--config jestconfig.json
2.4 配置 webpack
执行命令
1 | npm install --save-dev webpack webpack-cli cross-env |
配置 webpack.config.js
1 | const UglifyJsPlugin = require('uglifyjs-webpack-plugin'); |
这里在配置中使用
ts-loader和uglifyjs对编译生成的 js 进行处理。
2.5 配置 package.json
在 scripts 下添加:
1 | "test": "jest --config jestconfig.json --coverage", |
三、总结
轻量、快速、简洁是我这次搭建 npm 库的要求,目的是为了让这个 npm 库可以做到「适合」需求。要做到「适合」,并不是一件容易的事情。这次是我首次使用 Typescript 研发,使用之前的 SDK 研发原则和经验进行尝试,并抽象出了这么一个 ts npm 库的框架。除去语言本身,SDK 的研发原则和思路是相通的,在各个端都能以这种方式进行。有了原则和思路,就能确定项目的结构和流程,使用什么语言也就不重要了。